-
What's New?
-
Case Studies
- "Can I use 50L bladder on 15G accmulator?"
- Many Users Didn’t Use Accumulator Correctly
- What Is Water Hammer and Solutions?
- Accumulator Service on German Equipment
- Do I need a stainless steel accumulator for the water service?
- Bladder Failure Cause and Prevention
- Why accumulator leaks?
- Accumulator Repair: Hydac or Headache
- Do not confuse the pressure ratings between ASME and CE/PED certificates
-
Technical & Service Guide
- Many Users Didn’t Use Accumulator Correctly
- What Is Water Hammer and Solutions?
- Countries Accepting ASME Code
- Does Bladder Have Pressure Rating?
- Do I need a stainless steel accumulator for the water service?
- Pulsation Dampener Installation & Charging Guide
- Diaphragm Accumulator Charging Instructions
- Accumulator Assembly Instructions
- Bladder Failure Cause and Prevention
- Accumulator Charging Guide
- Bladder Buying & Storage Guide
- Why accumulator leaks?
- Accumulator Repair: Hydac or Headache
- Do not confuse the pressure ratings between ASME and CE/PED certificates
- Show all articles (4) Collapse Articles
Why accumulator leaks?
Accumulator leak is one of the major problems durging our maintenance or troubleshooting services. It’s not unusual enven under normal operations. In most of the cases, the leak comes from the improper seals installation, either for new applicaton or after the bladder replacement.
How to install the seals correctly?
Follow the following 3 steps to always install the seals correctly and prevent the accumulators from leaking:
1) After install the fluid port assembly and pull out it through the anti-extrusion ring, pre-charge the bladder with pure nitrogen slowly while holding the fluid port straight in position until the baldder pushs the poppet valve and spring inside the fluid port to the end. This will normally read about 20PSI. Visually check the fluid port, make sure it’s positioned right in the middel, concentric to the shell openning circle. Then move to the next step to install the seals.
Some manufacturers put the seals in position first, then pre-charge the bladder. We don’t recommend this way, which can not gurantee that the seals not move or twist under charging pressures.
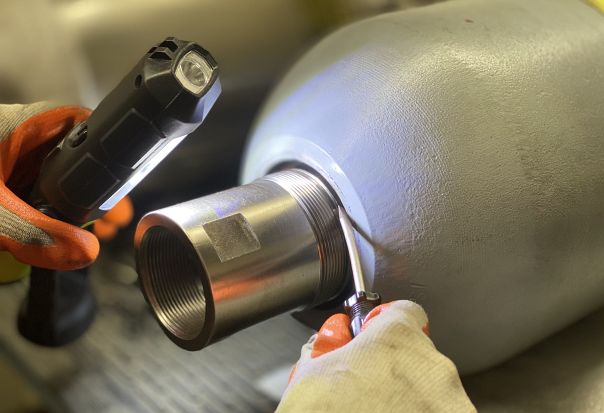
2) Install the seals in order as instructed. Since there’s pressure pre-charged, the rubber seals will not go through smoothly. Use blunt tools to push the seals in little by little, until all the seals get in and expand evenly inside.
3) Visual check with lights, make sure the O-ring and back up ring installed in the groove are flat and expanded evenly with no twist, curl or bmup. If there is, use blunt tools to fix it.
Many customers tend to replace bladders or re-assembly the accumulators by themselves. However no every customer follow the instructions completely. Instead they did it in their own way.
There are some others problems from not following the instructions, we’ll talk about them in the next topics.
By following these stpes and standard, our accumulator leakproof installation has 100% satisfaction from the customers with no problem report.
Check our full complete accumulator assembly instructions.


